


Fast Albright Knot
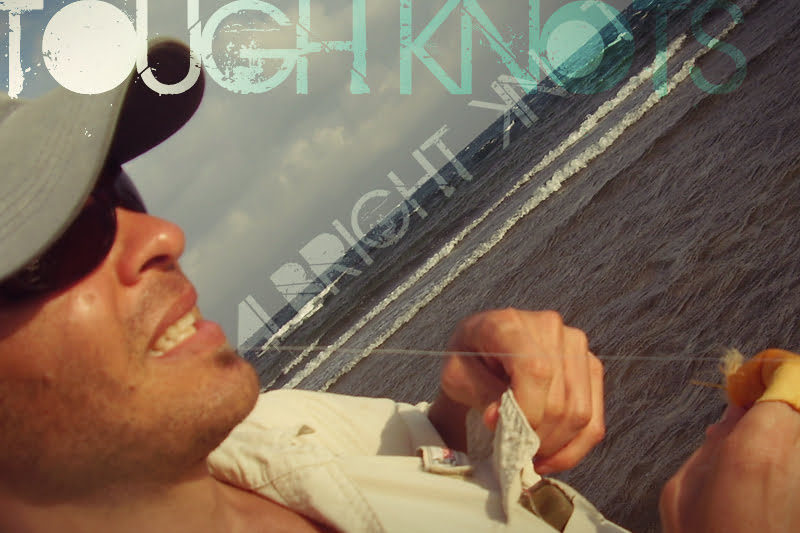
Tying on a Bite Tippet
One of the trickiest things to do is join different size monofilaments, which you have to do when fishing for species that require bite tippets… like tarpon. There are many knots out there for this, and to make a choice can be to choose sides. Huffanagle vs. Improved Blood, Slim Beauty vs. Albright Special, and so on.
Learning any of these knots isn’t difficult, and they’re strong enough to do the job. The problem is most take way too long to tie. I mean, if you prep all your leaders before-hand, no worries, but what if you’re bonefishing and you find a school of tarpon busting sardines? Even if you have a tarpon fly in your box already attached to a shock-tippet, it takes time to properly attach it to your leader. In a blitz situation, time equals fish… or fish lost.
That’s where this knot comes in. It’s an Albright Special, but tied much differently than you typically see it done. I picked this method up from a Barramundi guide in Australia. He used it to attach bite tippet for tough-mouthed “barra’s” as they called them, but it works great for tarpon, snook and big jacks, and it’s fast.
Step-By-Step
How to Tie the Fast Albright Special
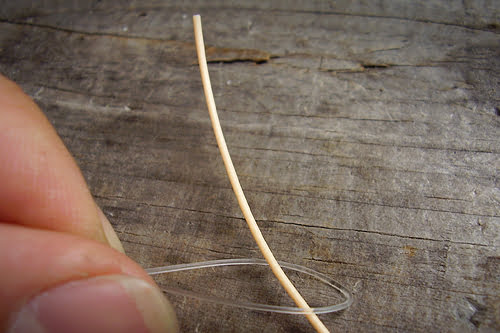
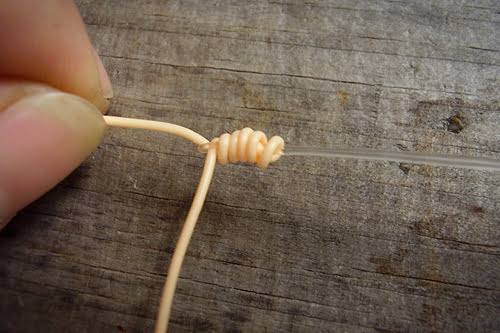
Step 1
Double over about 2 inches of the bite/shock tippet (clear mono on left) and insert 3-4 inches of leader material (pictured here as the pink line on right) through the loop formed by the bite tippet.
………………
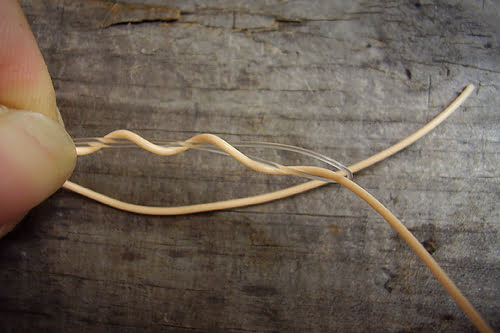
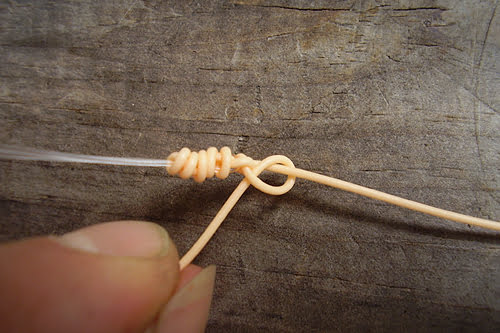
Step 2
Make 3 full wraps around both strands of the bite tippet with the tag-end, wrapping away from the end of the loop. (It must be at least 3 full wraps or the knot will likely slip.)
………………

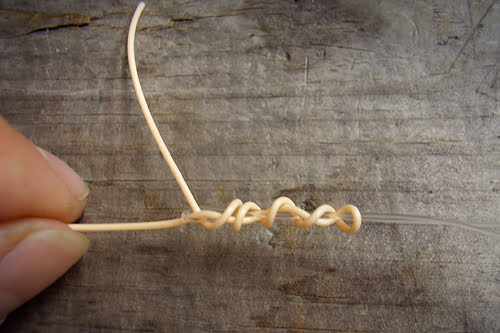
Step 3
Make the same number of wraps (3) back up the bite tippet toward the standing part of the leader and insert the tag end through the loop so it points in the opposite direction as the main leader.
………………
Step 4
Moisten the knot and pull on the standing part of the leader while keeping a firm grip on the bite tippet. You might also have to hold onto the tag end (with your teeth or pliers) to keep it from slipping through. Leaving a longer tag will help prevent this.
………………
Step 5
Pull gradually and firmly until knot seats all the way. The tag-end should now be at right angles to the knot and the wraps should be tight and snug.
………………
Step 6
With the tag-end make a half-hitch (over-hand knot) around the standing part of the line and pull tight. Repeat 2-3 times until the main leader is in line with the bite-tippet. Trim the bite-tippet tag close; leave a short tag on the thinner leader-line to keep the half-hitches from coming undone.
………………
FISH BONES, Guided Fly Fishing is a private guide service located on the island of Grand Cayman. We specialize in wading fly fishing for bonefish and tarpon, with over 15 years of experience guiding and teaching anglers to fly fish the flats. Catch-and-release, sustainable sport-fishing. 100% Local!